Fishkeeping Tips 13: Culturing Blackworms


   Continued
   Fishkeeping
   Tips

    Introduction

   Setting Up

   Brine Shrimp

   Red Worms

   Blackworms

   Daphnia

   Vinegar Eels

   Filtration

   Heaters

   Lights

   Keeping Plants

   Water Changes

   Books

   Breeding

   Making Stands

   Downloads

   FAQ's

   Site Index

   Fixit Guide


     Blackworms are one of the best live foods available in the hobby, and farm-raised worms are
     purchased from local fish stores. Kept in a plastic shoeboxes in the refrigerator, most know to rinse   
     the worms frequently, feeding crushed dry fish food, and they can survive for months. But they do not  
     seem to reproduce, and most believe they need to be kept at low temperatures, or that they breed
     especially slowly.

     See below for how to maintain blackworms bought at the local fish store.  

     The truth is that they will thrive and breed at room temperature, though reproduction can be slow.
     They require 2 essential foods- the bacteria that forms on unbleached paper towels, and a crushed fish food.
     I feed all dry foods, and do not keep them to a vegetarian based diet- all which is eaten eagerly and gone 
     within a couple hours. In their container should be a few strips of brown paper towel that will quickly become
     slimy, and the worms will clump together on the towel strips. I change the strips about every 2-3 weeks.

     In this setup, the worms reproduce through fragmentation, where adults will break apart, growing new 
     individuals. If they are injured and separated, each piece will create entire new worms.

     This is not a project for everyone, and the daily attention and regular water changes are not the easiest
     commitment. However, the blackworms produced this way are larger and especially healthy, and make 
     a huge difference in overall health and breeding of many types of fish. It was a surprise to find that they   
     can be maintained and even bred in the fishroom.

     Problems - once the setup is constructed and it doesn't leak- the biggest concern is water quality.
     The worms are fed a lot, and they are fed daily, so they put out a lot of waste. This requires 50% water
     changes about every 3 days. I am currently at about 20% of worm capacity. Water will foul more
     quickly when there are more worms, and less when there are fewer. Currently the worms receive about 
     a teaspoon of dry food daily. Though the water will turn slightly yellow as it becomes ready to be changed,
     the setup is clean, efficient, does not smell, and produces a fair amount of an ideal live food.

     Everything with this setup was done trial and error- if you discover an improvement to this design, I would
     love to hear about it! Please email me at selectaquatics@gmail.com .


     Pic 1- Begin with a plastic Sterilite 3 drawer dresser. This one was bought 
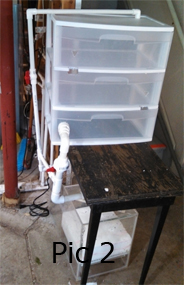
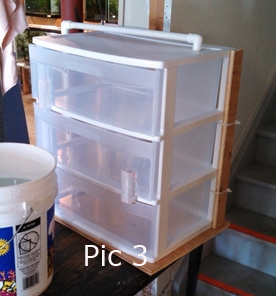
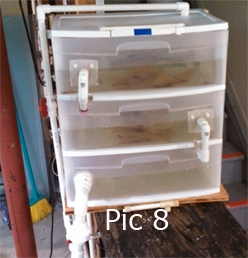
at a discount store in Seattle.
     Pic 2- A wet/dry filter is set up below and PVC is roughly in place to fill at the top while the bottom drawer
     drains down to the filter. An overflow escape line is put in to adjust flow (see pic 4). Notches are cut
     in drawers 2 and 3 to allow for drains to be put in, so that one drawer will drain down to the next.
     A bulkhead was created for the bottom drawer, connected to a line that drains to the filter. 
     Drains and fills are always at opposite ends of each drawer from one another.
     Pic 3- The unit is not strong enough to hold 2-3 inches of water in each drawer without the structure buckling.
     So splints were added to the back sides with electrical ties for support, and the unit was placed on an
     even wood platform. The box is not attached to the base. An earlier type of drain can be seen on the 2nd
     drawer. The problem was that the two plastics could not be glued together without developing leaks, so the
     bulkhead idea (seen in Pic 5) was used instead.
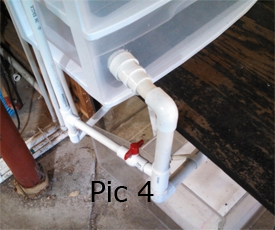
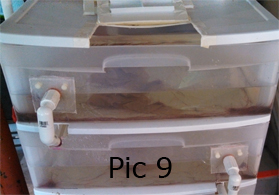


    Pic 4- The line down to the filter. An overflow escape line was put in connecting the fill line from the sump
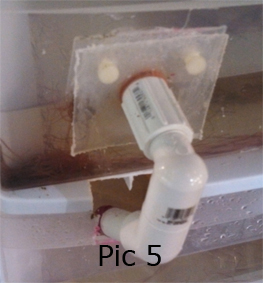
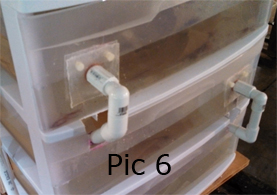
    (top PVC line to left) to the drain line into the filter. The red valve allows fill water to be diverted back into the
    filter to adjust flow into the box above. This way the pump is not restricted, and extra filtration occurs to 
    water that is sent back to the filter medium- in this case foam pads that are rinsed monthly in aquarium water.
    Pic 5- After a couple tries of other designs, this type of bulkhead for the drains works best without leakage.
    Standard aquarium safe silicone glue is used. Nylon screws hold the plastic base for the bulkhead to the
    drawer.
    Pic 6- Both drains lines on top two drawers.

    Set up this way, both the top and middle drawer can be pulled out 3-4 inches without any leaking to remove
    worms, change paper towels, etc. Pull out further and the water weight becomes unwieldy. The bottom
    drawer bulkhead attaches to a screw collar that can be undone, allowing for the bottom drawer to be pulled  
    out. This screw disconnect collar can be seen in pic 8.


    Pic 7- An inside view of the bottom drawer bulkhead. Specific bulkheads can be bought, this was
    made from PVC parts that were fashioned with a dremel tool. Later the joint has been strengthened
    with plastic plates glued in with silicone (like bulkheads on top two drawers.)These were then
    strengthened with nylon screws, just as the other bulkheads are, to prevent leakage. Silicone and
    various plastic cements did not adhere well to this plastic, even when roughened beforehand.
    Pic 8- A front view of the finished, working unit.
    Pic 9- A closer view of the paper towel strips and worms that tend to cluster in clumps within the 
    corners and folds of the paper towels.

    Currently the top two drawers are being used to raise worms, and the bottom drawer has tended
    to collect mulm and excess food, which is removed as it accumulates.


                   To Previous Tip                                                                              To Next Tip                         


                             Update- After a few months of use, here's how it has worked out:

      - It has worked great. I have been able to feed from it daily, and so far have been able to maintain 
     enough going so that the culture appears to be replenishing as I feed from it. I don't feed much, maybe
     their reproductive doses of about 20 worms each. I may increase my feedings as I get a better sense  
     of their reproductive rate.

     - I have found that you can put 1 lb. of worms in a drawer without fear of overpopulation. (Not enough
     circulating water in the system when compared to the number of worms), and I do not put worms in the
     bottom drawer. You could probably go to 2 lbs per drawer, but that would be pushing it. In the bottom
     drawer I have lightly covered- about 3/4ths the area- the floor of the bottom drawer with a 1/4" natural
     gravel. ( I buy "pea gravel" from a home improvement store, and sift it through a 1/4" wire mesh/ fencing,
     available at the same store - and use the larger gravel, sprinkled across 1/3 - 1/2 the bottom of the 
     aquariums, to assist biological filtration.) That may help keep up water quality.

     - I turn off the pump to the wet/dry when feeding, letting the crushed dry food settle to the bottom.
     Most food is consumed within 10-20 minutes, approximately 1/2 - 3/4 teaspoon of food goes into each
     drawer. The food is first soaked in a small container of water and then squirted in over the worm clumps
     with a turkey baster. I then need to change about 40% of the water (A 5 gallon bucket) every 2-3 days.
     Books say the worms can go long periods without eating, but daily feeding is producing robust, healthy
     worms that will hopefully reproduce regularly.

     - The foam pads in the wet/dry filter foul quickly, and have needed to be taken out and rinsed about
     every 3 weeks.

     - Water changes have been done by simply siphoning out the water in the three drawers down to about
     an inch for the worms. The second drawer is pulled out about 2 inches, and that way the water change
     can be done quickly as the other drawers do not need to be pulled out. The top drawer is drained from
     the top opening cut in for feeding, the second drawer is siphoned from the front through the opening
     made by pulling the drawer out, and the third drawer is siphoned from the back, through the space
     opened by the second drawer being pulled forward. Based on where the drains on the drawers are
     located, each drawer holds about 2.5 gallons.

     - The worms are very intolerant of chlorine. In this room the water changes are done from a nearby
     75 gallon aquarium. the only disaster so far has been a substantial portion of the worms were wiped
     out from a water change to their setup that happened at the same time a water change was happening
     on the 75. Though teh tap water is immediately diluted when it hits the aquarium water, the concentration
     of chlorine was still too high as a  result of the siphon's proximity to the fill line from the tap.

     - If you have any questions, just drop me an email at selectaquatics@gmail.com.


                        How to Keep and Maintain Blackworms
                     bought at the Local Fish Store (Normally)


     Most Fish stores purchase their worms from large farms that culture blackworms for the fish hobby.
         In the past many types of worms were harvested from natural conditions, leading to a wide variety
         of creatures received with the worms as well. But today the cultures are fairly clean, depending
         on the source your local merchant uses. If they are not available to you through a local fish store
         they can be ordered from the same farms online, generally about $20 - $25 a pound.

         That said, most blackworm cultures will often contain a number of small leaches that live with and
         feed on the blackworms. If you are feeding cichlids or larger fish, the leaches are just exctra
         protein. Personally, I remove them with a set of tweezers, I do not know if they pose any harm to
         the fish. They are white rather than reddish brown, oval shaped, and somewhat stiff looking. They
         are no harm to us, and can be easily removed. I do not know if they pose any harm to the fish.

         Blackworms work somewhat well for local shops, because they can go fairly long periods without
         eating. The better shops will have installed a continously circulating water system for the
         worms so they do not deteriorate quickly, and when you receive them you can assume they have
         gone 4-10 days without eating.

         Many fishkeepers find out when their shop receives its order, then picks them up as soon as
         possible after delivery. Gradually the worms die off, becoming slimy and limp. However, they can
         be brought back to their natural health and vigor, providing far better nutrition for your fish,
         and over time they will even reproduce. Here's what you do-

         Once you bring the worms home, put them into a plastic shoebox type container and gently pour a
         little bit of aged aquarium water over them to separate them, and free up any dirt and waste.
         Then pour it off, and keep doing so until the water runs clear. The worms need to breathe, so no
         more than about 1/2 lb. (by weight) should be kept in any single container.

         Then drain down the water until the worms are exposed. Sprinkle a dry fishfood that has been
         crushed between your fingers. Use a fishfood that contains both a vegetable and meat component
         (most commercial general use fishfoods are perfect- Tetra min, for example, works fine). Some
         people claim the worms are vegetarian, I have not found that to be the case. After 10-20 minutes
         the worms will have eaten the food. They can eat a fair amount- I will often keep feeding them
         until food is left uneaten. Then rinse again, once again until the water runs clear, then leave
         just enough water to cover the worms, and keep them in the refrigerator. You may choose to keep
         the container covered, with air holes, as they will venture up the sides of the container. Rinse and
         feed daily. they can go a couple days without eating if necessary, but as they eat a lot, they put out
         a lot of waste, so daily rinsing is important if they are to be kept healthy.

         Within 2-4 days they will become vigorous and wiry with a dark red color. I feed them to the fish
         with a turkey baster, and the blackworms will live for months in the aquarium if not eaten

         For special smaller fish there is a way to culture them in the tank where they are available to the
         fish 24/7. Take a round butter container and put about 3/4ths of an inch of gravel over the bottom.
         Place the container in the aquarium, and gently squirt a dollup of worms over the gravel from a turkey
         baster. The worms will fall to the gravel and anchor themselves, heads up, in the gravel. Once a day
         gently squirt a mix of water and crushed fishfood over them so it settles on the gravel. The worms
         will stay where they are anchored, and will even reproduce. I have kept small colonies going in
         killie tanks for many months. Larger fish, of course, will make short work of a few worms in a butter
         container, but for fry or a pair of smaller fish it is ideal.


                            Home                   Contact Us                    Receiving Shipped Fish                   Keeping Select Aquatics Fish